
News

To change a cabin air filter, locate the filter housing, remove the access cover, pull out the old filter, check the airflow direction, insert the new filter in the same airflow direction, and reinstall the cover and any panels you removed. In many vehicles, the cabin air filter is located behind the glove box, and the entire replacement takes about 10–20 minutes.
Most cabin air filters are located behind the glove box. Other common locations are underneath the dashboard on the passenger side or inside the engine compartment near the base of the windshield.
The three main cabin air filter locations are:
| Location | How to Access It |
|---|---|
| Behind the glove box | Lower or remove the glove box to expose the filter cover. |
| Under the passenger-side dashboard | Remove the lower trim panel or filter access cover. |
| Under the hood | Open the hood and check near the windshield cowl or fresh-air intake. |
If the filter is not visible behind the glove box, check the vehicle owner's manual for the exact cabin air filter location. The location is determined by the vehicle's HVAC design, so there is no single position used on every car.
Most cabin air filter replacements require no special tools. Filters behind the glove box are commonly accessed by releasing clips, tabs or glove-box stops by hand.
Some vehicles require:
Do not force a glove box, plastic clip or filter cover. If a panel does not release after the visible clips are removed, check for an additional screw, damper arm or locking tab.
Open the filter housing and pull the old cabin air filter straight out without shaking or crushing it. Before removing it completely, look at the arrow or orientation marking on the filter.
Switch off the engine, fan and climate-control system before opening the cabin air filter housing.
If the filter is behind the glove box, empty the glove box first. Release the glove-box stops or side tabs and lower it carefully. Some vehicles also have a small damper arm attached to the side of the glove box that must be disconnected.
You should then see a long rectangular filter cover on the HVAC housing.
Release the clips or tabs and remove the cover. Keep the cover level so the locking tabs are not bent or broken.
Look for markings such as:
Note the arrow direction before pulling the filter out. This makes installing the replacement much easier.
Slide the filter out in a straight line. An old cabin filter often contains dust, leaves, pollen and other debris, so removing it slowly helps keep dirt from falling into the HVAC housing.
If the filter says “AIR FLOW,” the arrow must point in the direction the air moves through the HVAC system. If the filter says “UP,” the arrow must point upward. These markings do not mean the same thing.
This distinction is important because an UP marking describes the physical orientation of the filter, while an AIR FLOW marking describes the direction air passes through it.
Do not automatically point a cabin air filter arrow up or down. Read what the arrow represents.
If it says UP, point it upward. If it says AIR FLOW, install it according to the airflow direction shown on the filter housing, the removed filter or the vehicle instructions.
On many behind-the-glove-box systems, airflow travels downward through the filter, so the AIR FLOW arrow points down. This is not a universal rule and should not replace the markings provided for the specific vehicle.
If the new filter has no direction marking, check the filter housing and compare the construction of the replacement with the filter you removed. If the vehicle specifies a particular installation direction, follow that orientation rather than guessing.
Insert the new cabin air filter evenly into the housing without bending the filter media, then reinstall the access cover.
Before installing the replacement, remove loose leaves and visible dirt around the opening. Wipe accessible surfaces carefully or use a vacuum to collect loose debris.
Do not push dirt deeper into the blower or HVAC system.
Place the new filter next to the old filter and compare:
The new filter should fit into the housing without excessive force. A filter that is too large, too small or the wrong shape should not be installed. For manufacturers, maintaining this level of dimensional consistency starts with a stable cabin filter production process, especially during pleating, bonding and trimming.
Align the AIR FLOW or UP marking correctly and slide the filter fully into the housing.
Keep the pleats straight. Do not fold, crush or force the filter past the housing edges.
Push the access cover back into position until all clips or locking tabs are fully engaged.
Reconnect the damper arm if the vehicle uses one, return the glove box to its normal position and reinstall any screws or trim panels removed during the process.
A typical cabin air filter replacement takes about 10–20 minutes. Vehicles with a filter directly behind the glove box are usually the fastest because only a cover and several clips need to be released.
Replacement takes longer when the filter is located behind dashboard trim, underneath the vehicle's interior panels or beneath the windshield cowl.
Changing a cabin filter is straightforward, but several installation mistakes can reduce airflow or make the filter fit incorrectly.
This is one of the most common mistakes. Always distinguish between an AIR FLOW arrow and an UP arrow before installation.
A correctly matched filter should slide into position with normal hand pressure. Forcing it can crush the pleats, deform the frame or indicate that the replacement filter is the wrong size.
The pleated media needs to remain evenly positioned across the housing. A badly folded filter can leave gaps around the edges and reduce effective filtration.
Leaves and large pieces of dirt should be removed before the new filter is installed. Otherwise, debris can restrict airflow or create noise inside the ventilation system.
Make sure every tab or clip is locked after installation. A loose cover can cause air leakage, vibration or rattling.
Do not select a filter based only on its appearance. Match the replacement to the correct vehicle year, make, model and engine or HVAC configuration when required.
The filter is installed correctly when it sits flat in the housing, the direction marking is correct, the cover closes completely and the HVAC system operates without abnormal noise.
After installation:
If airflow becomes noticeably weaker immediately after replacement, reopen the housing and check whether the filter is folded, incorrectly positioned or the wrong size.
A common cabin air filter replacement interval is about 12,000–15,000 miles, or roughly once a year, unless the vehicle manufacturer specifies a different interval.
Replace it sooner when the filter becomes visibly dirty or when the vehicle regularly operates in areas with heavy dust, pollen, pollution or frequent construction traffic.
Common signs that a cabin filter needs replacement include:
Yes. Cabin air filter replacement is one of the simpler vehicle maintenance jobs. On vehicles with the filter behind the glove box, the job commonly requires no special tools.
Yes. A cabin filter with a specified airflow direction can be installed backward. Always follow the AIR FLOW arrow or the installation marking on the filter housing.
An incorrectly installed filter can fit poorly, deform inside the housing or interfere with normal airflow. Reinstall it in the specified direction and make sure the filter frame sits evenly inside the housing.
Standard disposable cabin air filters should be replaced rather than washed. Washing pleated disposable filter media can damage its structure and filtration performance. Only clean a filter when the filter manufacturer specifically identifies it as reusable or washable.
A cabin air filter is a relatively simple replacement component for the vehicle owner, but producing filters consistently requires controlled pleating, forming, cutting, bonding, assembly and inspection processes. Filter dimensions, pleat consistency and frame quality all affect how the finished filter fits into the vehicle's filter housing.
For manufacturers producing automotive cabin air filters and other filtration products, MOER provides filter manufacturing machinery for different filter production processes. Selecting the correct production equipment depends on the filter structure, media, dimensions and required production capacity.
Previous: Cabin Air Filter Replacement Cost
Next: NULL
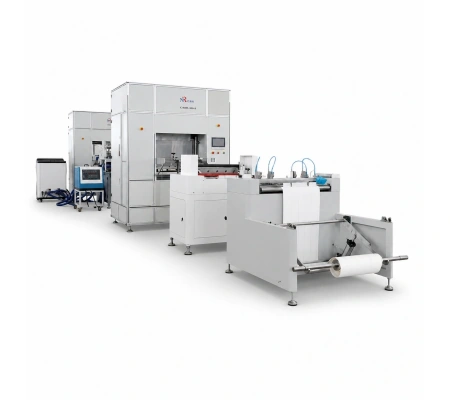
Pleating Height: 100–400 mm
Pleating Speed: 0–200 pleats/min
Max. Media Width: 700 mm
Max. Product Width: ≤650 mm
Production Capability: 25 m/min
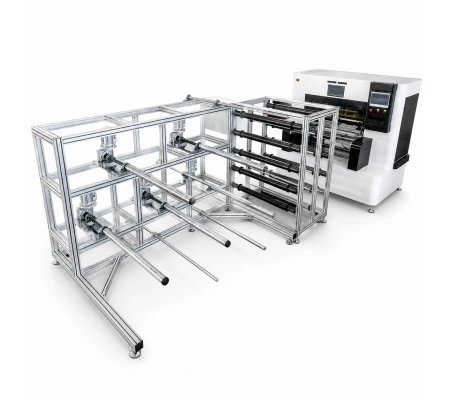
Working Width Range: 700–3000 mm
Pleating Height Range: 4–150 mm
Pleating Speed: Up to 400 pleats/min
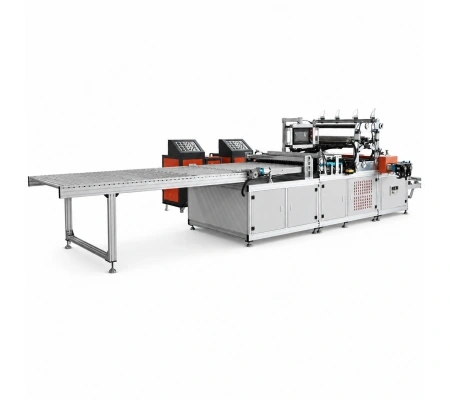
Max. Media Pleating Width: 1300 mm
Pleat Depth Range: 25–300 mm
Maximum Pleating Speed: 8–10 m/min
Hot Melt Nozzle Pitch: 25.4 mm
Online Slitting Cutters: 5 pcs
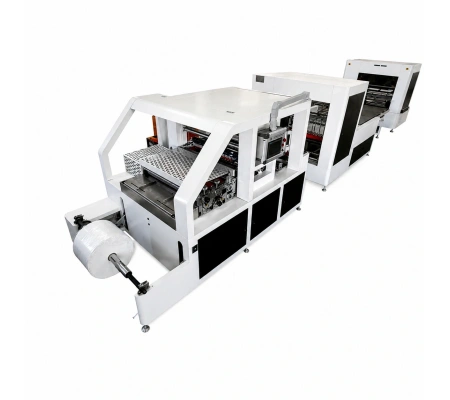
Max. Media Pleating Width: 700 mm
Pleat Depth Range: 16–100 mm
Maximum Pleating Speed: 8–10 m/min
Hot Melt Nozzle Pitch: 25.4 mm
Online Slitting Cutters: 5 pcs

Quick response within 24 hours

Expert advice tailored to your needs

End-to-end support for your success